7.05.2010

Zart! Gallery custom doors - II


Here are the trees I cut with a plasma torch (thanks, Kevy!) last week for the Zart! Gallery in downtown Des Moines. Some vineyard bar and a few hand-forged leaves will adorn the trees. Some forging of the trees is tomorrow's MO. The last pics have arrows pointing to the branches that will come out off of the door frame acting as the door handles. Should be pretty cool. Installation will be at the end of the week with D.B.

6.28.2010

Zart! Gallery custom doors


This week's focus is on an installation of twin doors based on the above staircase by Stephen Bondi. The rough opening is 96" wide by 89 1/2" tall - shown below in the frame I fabricated today out of 1 1/2" 14 ga. sq. tubing. Each door will have a tree cut from 14 ga. hot-rolled steel and then forged to give the tree some texture and dimensional relief. Additionally, 5/16" and 1/2" diameter vineyard bar will be forged and wrapped around the tree branches with handmade, forged leaves. The door frame, trees and all adornments will be finished with a forced oxidation and sealed with a satin, oil-based polyurethane.

6.23.2010

Simple things...


Some days, it's just looking at a board that has so much inner beauty you can't see until it's been planed that puts a smile on your face. Here's a piece of reclaimed pine that did just that today after one pass under the knives.

"...it's the small things in life"

6.20.2010

Palanjian finished desk


Ms. Palanjian's finished desk. Photo by my brother, "Snyder."

Reclaimed barn wood. Pinned mortise and tenon joinery throughout.

6.15.2010

Palanjian desk mock-up


A lot of headway was made on Amy Palanjian's barn wood desk today. All the mortises were drilled and tenons cut this afternoon. A new "old" acquaintance, Toby Larsen, graciously lent a hand in the evening with his wide belt sander making quick work of evening out the table top. (Toby and I both went to United Community years ago...small world)

The contrast in texture on the legs is intentional. The outside surfaces of each leg will remain the weathered, brown "patina" that mother nature so kindly sculpted over many, many decades. It conveys the fact that the lumber used in construction is actually barn wood. Fabrication will be finished up tomorrow with delivery on Wednesday.

I might have to build another one of these pretty soon...Thanks, Amy.

6.06.2010

Nightmares...

Someday, if any of my children want this bed, I'll happily build it for them. Maybe you have a twisted, macabre mind too and think this might suit your kids. Hit me up...we can make it happen.

*UPDATE*

If somebody is REALLY interested in this bed, I'll build it for them at cost just so I can see it come alive...Seriously...It has to be a child's bed or single mattress...I doubt it would be more than $200...

6.05.2010

Palanjian desk glue-up - "step by step"

Sometimes, I feel like I don't explain what I do enough...at least visually. So, as Amy wanted to see the wood "before and after," I thought I'd take the time to be really meticulous with this project's posting.


The board on the left has been run through the planer, now showing its true inner self. The stack on the right is the "patina" they've acquired over God knows how many decades of hay, manure (maybe) and general weathering. Kinda fuzzy on the outside, but definitely solid throughout the board.


After all of the boards have been planed, this is when I'll scan each side with a critical eye looking for odd characteristics, blemishes and differences in color compared to the others. Sometimes, mineral stains, knots and unique figuring make the piece and I'll intentionally include a "blemish." The third board from the left didn't make the cut due to it being just a little darker than the others. I don't mind some difference, but after a coat of poly, you'll really be able to tell what matches and what doesn't.


Here are the four boards that made the cut. The pieces of maple that are laying perpendicular to the board mark the overall length the desktop will be once it's assembled.


I don't know whether or not to be surprised that there's very little cupping, warping or movement in these pieces. Each piece was a breeze to rip for glue-ups on the saw, as shown here.


To help strengthen a simple butt joint glue-up, each interior edge that mates up with another is further secured with biscuit joinery. The biscuits also help to keep all the boards on the same plane, thus, making sanding simplified as the surface is not hampered with varying heights relative to each other....trust me.


Here's all of the edges after they've been jointed with the plate jointer. Joint is 3/4" on center since the overall thickness is 1 1/2".


After the joints have been glued and biscuited, this is (roughly) what the desktop will look like upon completion.


With any luck, tomorrow we'll be cutting mortise and tenon joints for the legs...and start sanding that top.

Thanks again, Amy! Cheers...

6.02.2010

Bedtime


We finally have a place that this bed will fit in...barely. Thanks to Dan Dahle for lending me a hand in getting the headboard up to the master bedroom. Queen size shown here. Interested in one for yourself? I'll fabricate any size at varying price points. Contact me: info at factoriifab dot com for more info.

That's one of our cats, Pablo, on the duvet.

Rural Recycling - Barn Salvage & Reclamation

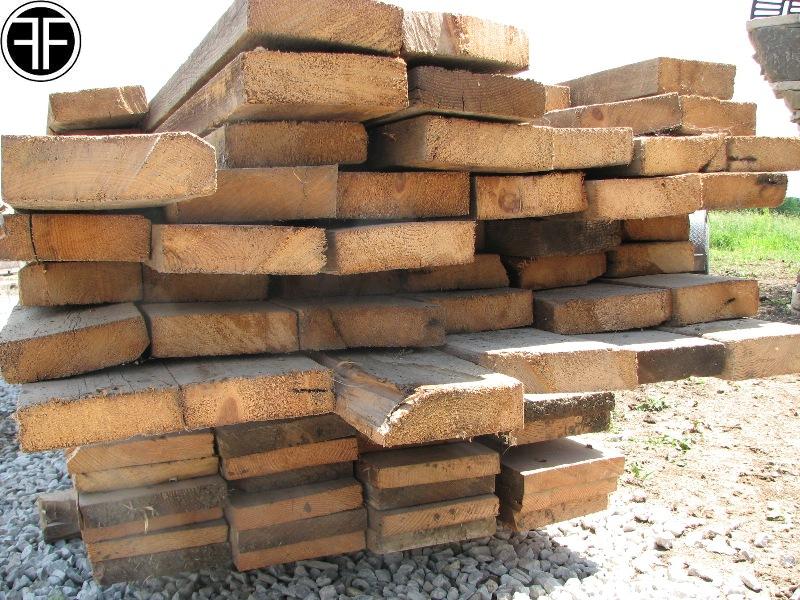
On a small farm in the middle of B.F.E., Winterset, you'll find (if you're lucky) one of the state's highest concentrations of old barns. Yeah, but these get the line *some assembly required*. Scott Henderson and his wife, Beth, travel around the state disassembling old barns that will either be sold as traditional whole structures, pieced out or built as new structures. Scott's Rural Recycling is about as cool as reusable resourcing can get. There's always something new in stock including the pieces below, some of which are going to become a desk for ReadyMade's deputy editor, Amy Palanjian.

Scott also does landscaping and stone masonry under the name Set In Stone. This is a recently completed structure on their property.


Pine, douglas fir, oak, walnut...


All of these mortise and tenon joints were cut by hand, folks. Hand drills, chisels and a mallet...yeah, think about that for a while. This practicum of carpentry may seem a bit antiquated, but it definitely had soul and personality. Both of which are becoming lost with each passing day...


This is just a small glimpse of all the old timbers at the Henderson compound. Does anybody realize when this stuff is gone, it's gonna be GONE forever. Not this lumber in particular, but all of the old barns. That's the cool thing about building with this stuff - giving new life to material that would have otherwise been burnt to ash. You can't rewrite the stories within these beams, but you can pen another chapter for future generations to enjoy...

Stainless steel island


This stainless steel island top was just installed last week for some friends in Ames. Actually, Sonya was in my brother's class in elementary school - small world, eh? Dr. Sonya M. Stoltze Newstrom and her husband, Ryan, are the brains and brawn behind the championship barbecue team Big T'z Q Cru based out of Ames, IA. Lots of state championships for somebody this young. Quite a promising future if you ask me! Congrats on the Memorial Day win here in Des Moines at Smokin' In The Junction, too.

Hopefully this new addition to their kitchen will help with their prep for competitions to come. Speaking of additions, you'll see Sonya's baby bump - congrats and good luck!!

Island substructure is two laminated pieces of 3/4" particle board. Stainless is 16 ga., 314 alloy. Measures 64" x 37" x 1 1/2". Thanks to Howe's Welding and Metal Fabrication for the bends/breaks on the stainless.

5.28.2010

From barn to bed....soon


After starting this project over a year ago, I'm hoping to bring it into our new home this weekend. I spent part of this afternoon pining the tenons with 3/8" wood lags. A comprehensive explanation of construction will follow upon completion of this bed...stay tuned.

Rosenberg Residence - Planter Deux


Tracy and Steve Rosenberg have fast become quite the clients. I love their modern sense of style and attitudes as stewards of their home. Here's the latest addition to the southern exterior wall of their garage. 14 gage mild steel with a forced oxidation finish. 32" x 96".

5.26.2010

Kraft Foods/Meredith dinner at Proof Restaurant - DSM, IA


On May 10, earlier this month, Meredith Corporation hosted a party here in Des Moines at Proof Restaurant for Kraft Food's Food & Family magazine. Friend and frequent collaborator, Daniel Hyland, was contracted to design the party's decor. I fabricated a couple of tall square planters, the table chargers and the 30" diameter center piece for the evening's festivities.

Cheers.

5.25.2010

The Big 6


I was happy to finally deliver Daniel Hyland's totally-sleek, ultra-low, super-cool coffee table to him this evening. Daniel is in the midst of a home renovation himself; as evidenced by the dusty wood floors (walls and ceiling were just skim-coated.) Modern doesn't begin to describe this piece, or what the room will look like. Bethany will be shooting some better pics of this when Daniel completes his living room.

Thanks again, D....

Specs:
Design and concept: Daniel J. Hyland Interior Design
Fabrication: Boonie - Factor II Fabrication
Materials: 1" mild steel sq. tube, 14 ga. hot rolled steel
Finish: Raw!
Dimensions: 72"L, 48"W, 6"H

5.18.2010

A House Is Never Done...


Yes, my posts have been few and far between. Yes, I've been busy building for clients. And yes, I'll be sure to get some photos of some current projects up soon. But, a few things have been consuming my time these days. Namely, Bethany (credit goes to her for the pics in this post) and I purchased a house in Des Moines in March. For the last couple of months, it's been a whirlwind of painting, plumbing, carpentry, masonry, electrical, more carpentry, MORE painting, bleeding, sweating, shivering, frustration, glee, demolition, flooring and some more painting just for good measure. Homeowners, you know what I'm talking about.

It never ends.

Especially today.

As we found out on Sunday, a queen size mattress was not going to fit up our existing stair structure due to a restrictive balustrade. I was damn determined to get that box spring up to the second floor today. That's where the demolition came in. I don't have any "before" pictures other than the old white oak balusters and railing that first lived there when the house was built. I guess frustration gave way to demolition at this point. Needless to say, I'll be fabricating a new detachable railing system in the very near future...

Additionally, I've taken a job as a line cook here in Des Moines at a place called Alba Restaurant in the East Village of downtown Des Moines. It's proved both challenging and rewarding all at the same time. It's creating and building on an entirely different level of food service I've yet to experience. Needless to say, I'm learning so much everyday...

Keep the inquiries and jobs coming...I'll be posting some of the work I've done for Daniel Hyland Interior Design in the coming weeks. He's become a dear, dear friend and a inspirational interior designer Des Moines sorely needs. Please check out his site and tell him I sent you. (He works both coasts and everywhere in between.)

So, until then, I'm gonna finishing drinking this beer, shower and hit the hay...

4.24.2010

Rosenberg Residence - "canine restraint structure"


I dropped off this mobile gate yesterday at the Rosenberg residence yesterday. Tracy had asked me last fall to start thinking of a dog gate for the coming spring. The oxidized finish matches the planter I fabricated for them last October. The switch grass negative image plays on actual organic elements placed in the planter box. To keep one's hands from getting rusty when moving, I sought out a couple of smaller tree limb crotches and attached them with some wood lags from behind. 1 1/2" sq. tube, 11 ga. mild steel plate, 3" x 3" x 1/4" angle and 2" swivel casters.

4.02.2010

"Keep it like a secret...."


Lest one think I'm not doing much these days, but 'aye!,' a bookshelf be in the making! Each section was built separately, and then fastened together on-site here at the London Underground in Ames. Like the built-in booth, all of this is comprised of 3/4" birch ply and trimmed in 1x choice pine.

The top picture shows a green arrow pointing to the "secret." This "secret" door will be used to conceal cleaning goods and probably a few empty beer cans until we put a padlock on it. I'm still trying to think of a clever way to hide a latch and/or pin that isn't too conspicuous.

The hinged door comes from my love of old TV shows and films that utilized this "structural chicanery." For instance, "Clue" had a bunch of them including the walk-in cooler to the parlor. Or, that one episode of "Webster" when Web, George and Ma'am moved into that big house from the high-rise apartment. I think the grandfather clock led to a secret passage that led to the basement dwelling where the older couple that owned the house lived...they were Russian if I remember correctly.

Okay, behind this door is a dead end...but it would've been cool if it was a secret exit to the back alley. Maybe next time.

Cheers...